Installation of Survey Solutions on Amazon AWS
The installation consists of the following steps:
- Create security group for web server and RDS to be able to communicate
- Create PostgreSQL instance
- Create EC2 instance for running Survey Solutions
- Install Survey Solutions
Create security group
In order to have connection between Survey Solutions and PostgreSQL you can create new security group as described in here.
From the AWS Management Console:
- Click on
EC2under theComputeheading - Scroll down the left-hand navigation to
Network & Security - Click on
Security Groups - Click on
Create security group
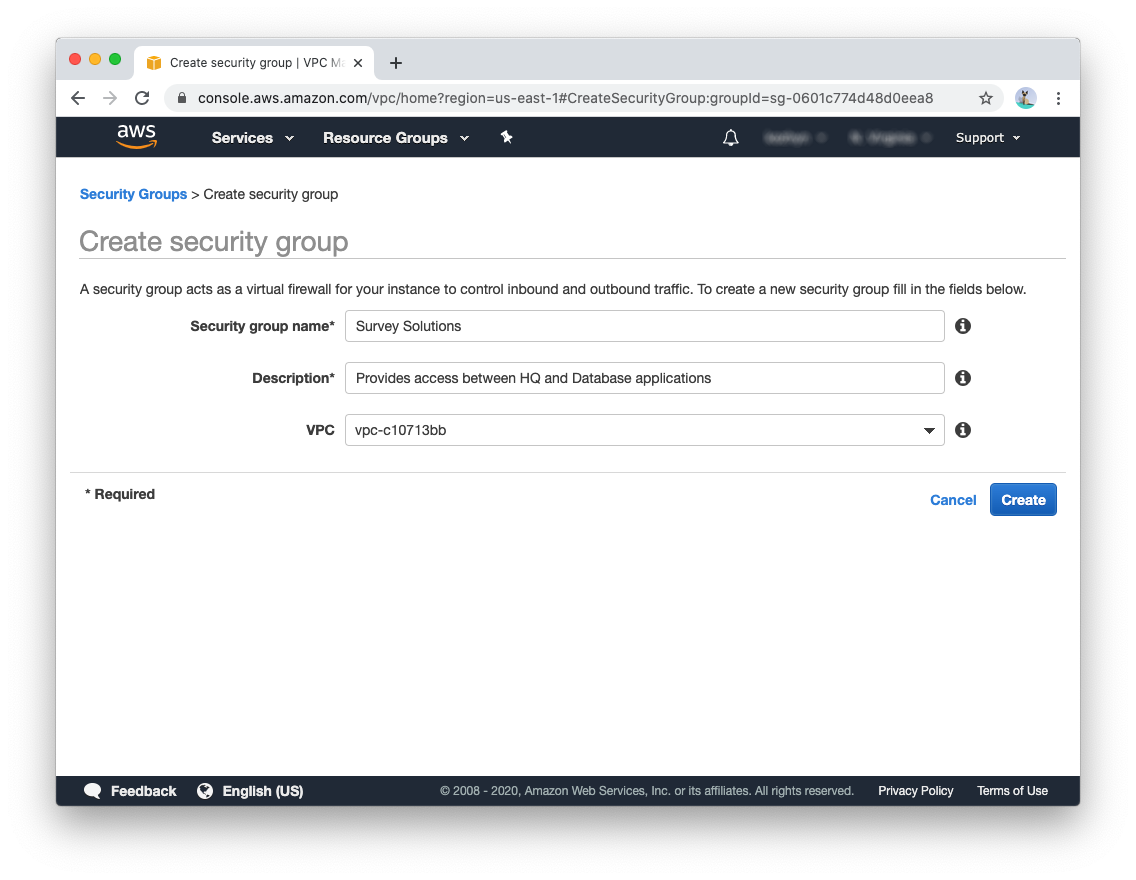
In the create security group specify name and description:
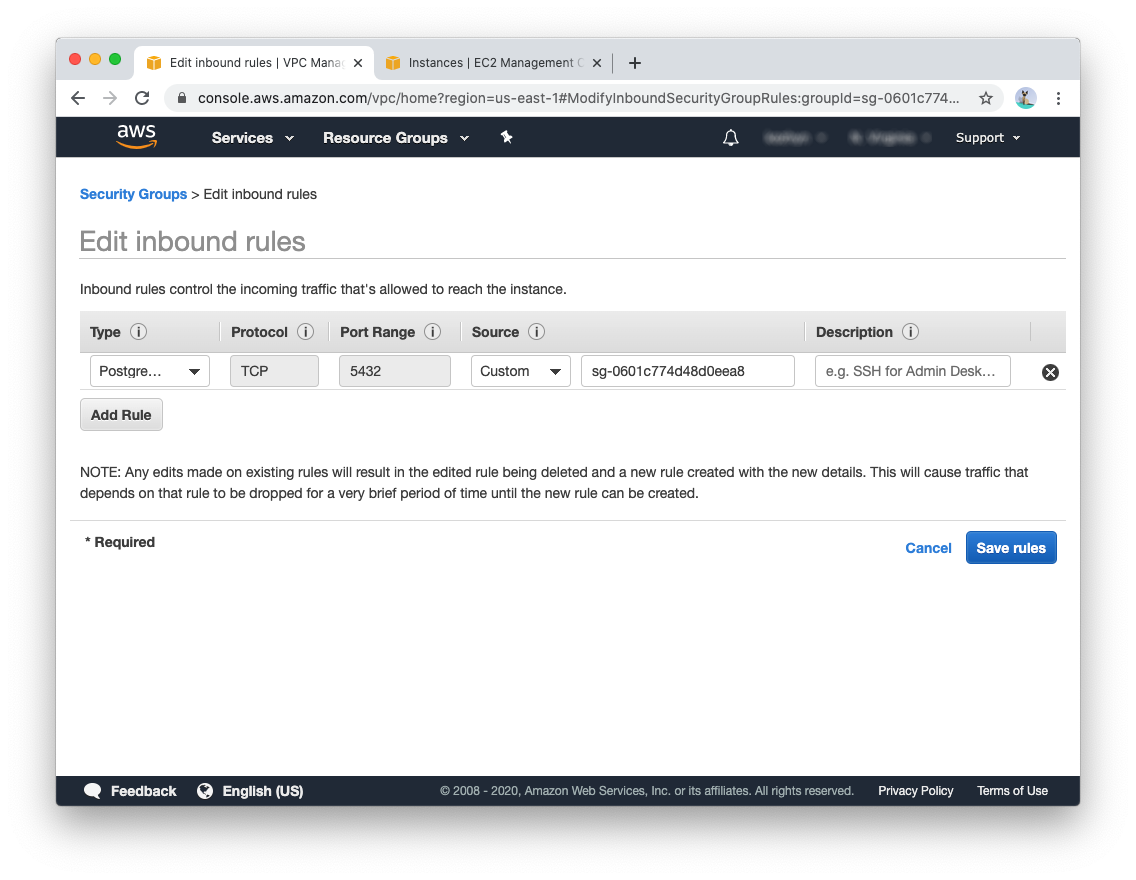
In the rules page add single required rule:
- Type: PostgreSQL
- Source: Start typing “Survey Solutions” and select just created security group
Create PostgreSQL RDS instance
Create an RDS PostgreSQL instance using this documentation, you don’t need to install a database client, but it can be used to test the database connection.
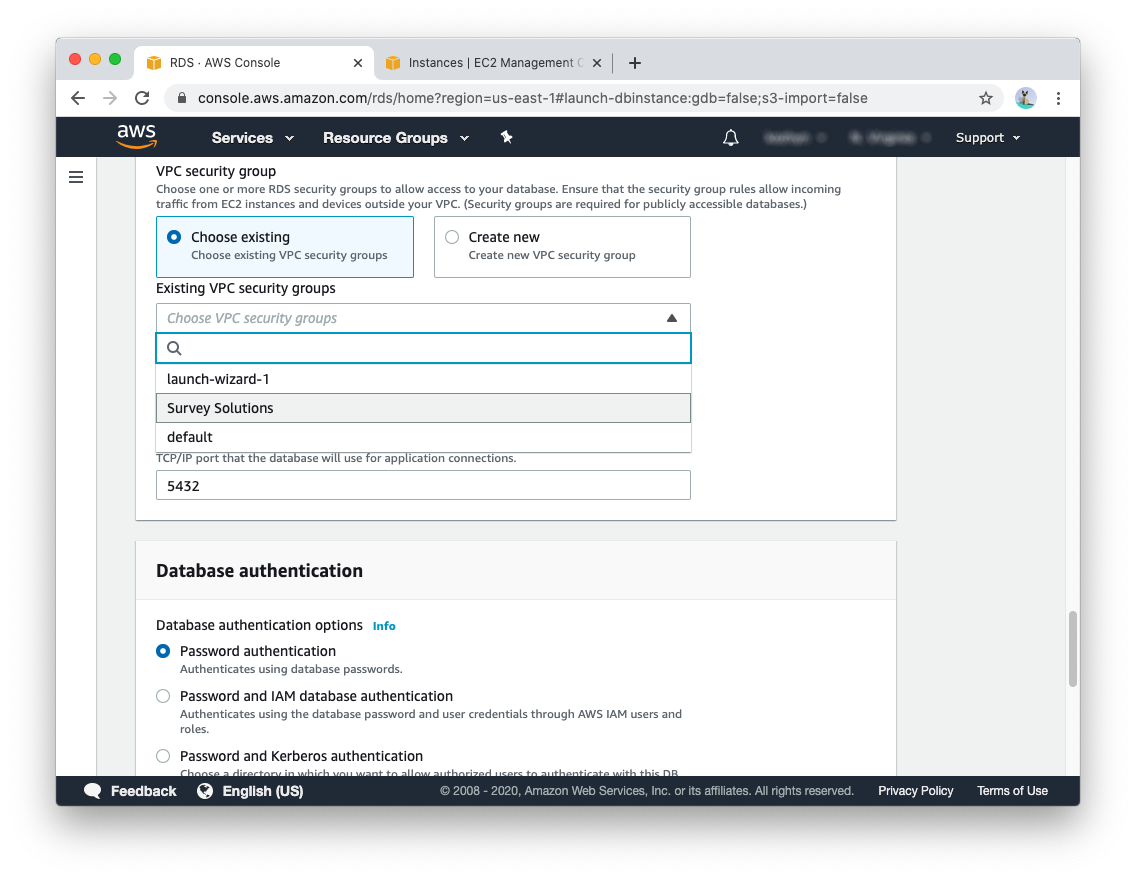
During creation process expand Additional connectivity configuration section and assign created “Survey Solutions” security group
Keep database port to be default one (5432)
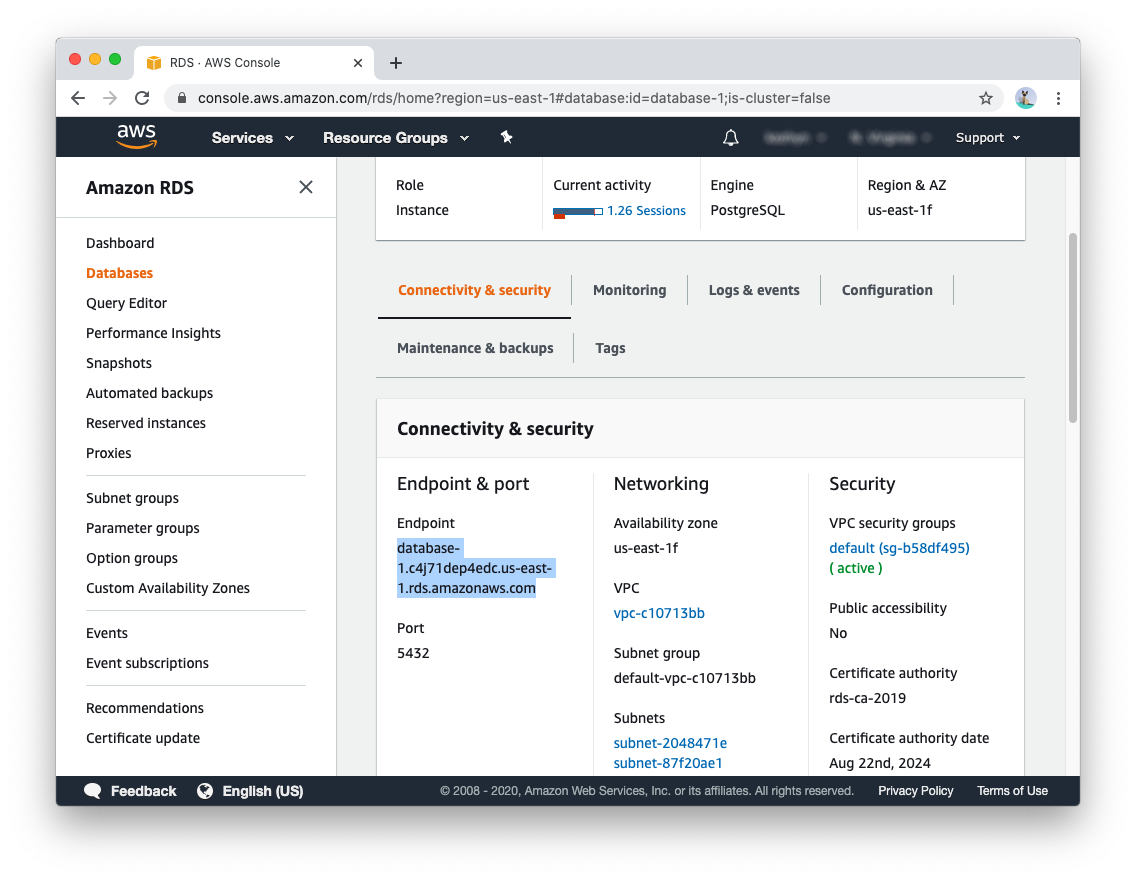
After database is started copy endpoint address
Be sure to retain the following information for accessing the PostgreSQL:
- login
- password
- endpoint
These details will be needed in a later step to connect the RDS with the EC2 instance.
To find the endpoint:
- Navigate to
RDSfrom the Amazon Management Console - Click on
DB InstancesunderResourcesin the main pane - Click on the RDS instance DB identifier of the desired RDS
- Click on the
Connectivity & securitytab - Copy the endpoint under
Endpoint & port
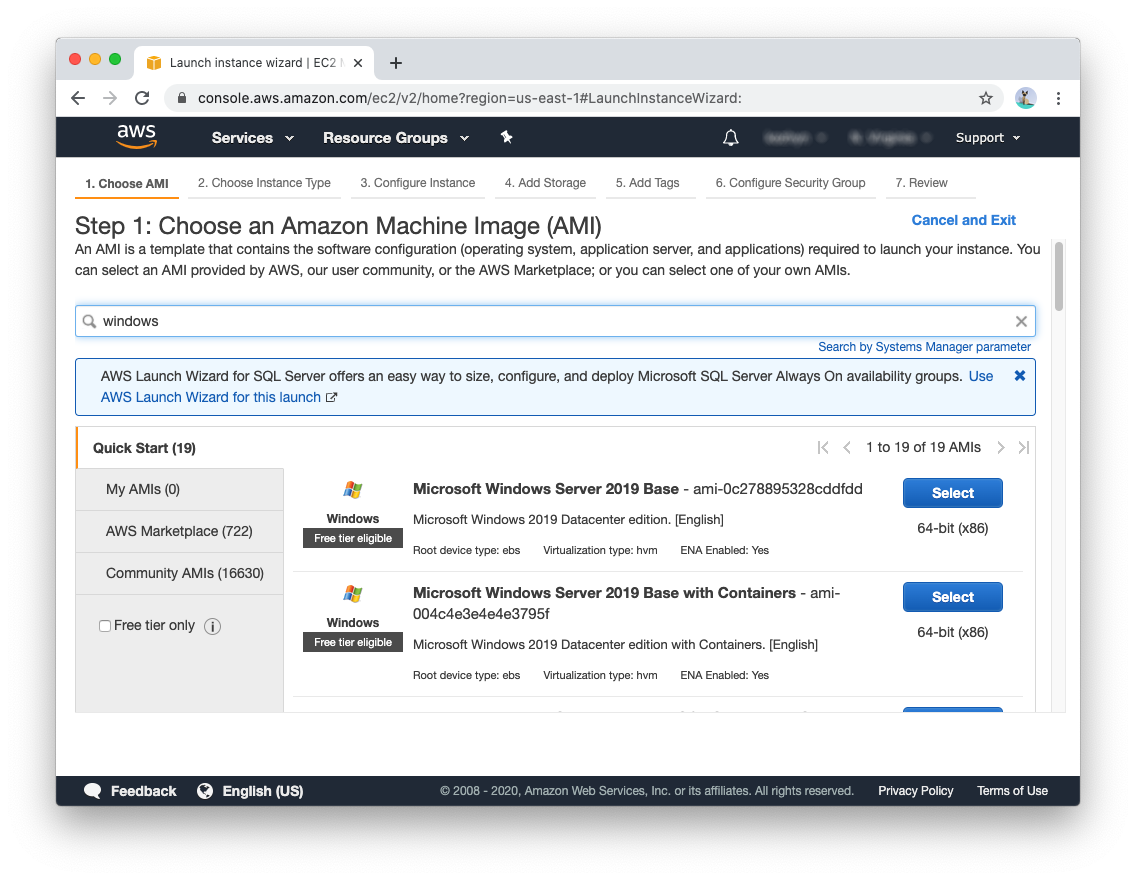
Create EC2 instance
- In the services list Compute section select EC2
- Find “Launch instance menu”

- In search bar type “Windows”
- Select Microsoft Windows Server 2019 Base
- In tier selection pick one that suites your needs. You can check for server requirements here.
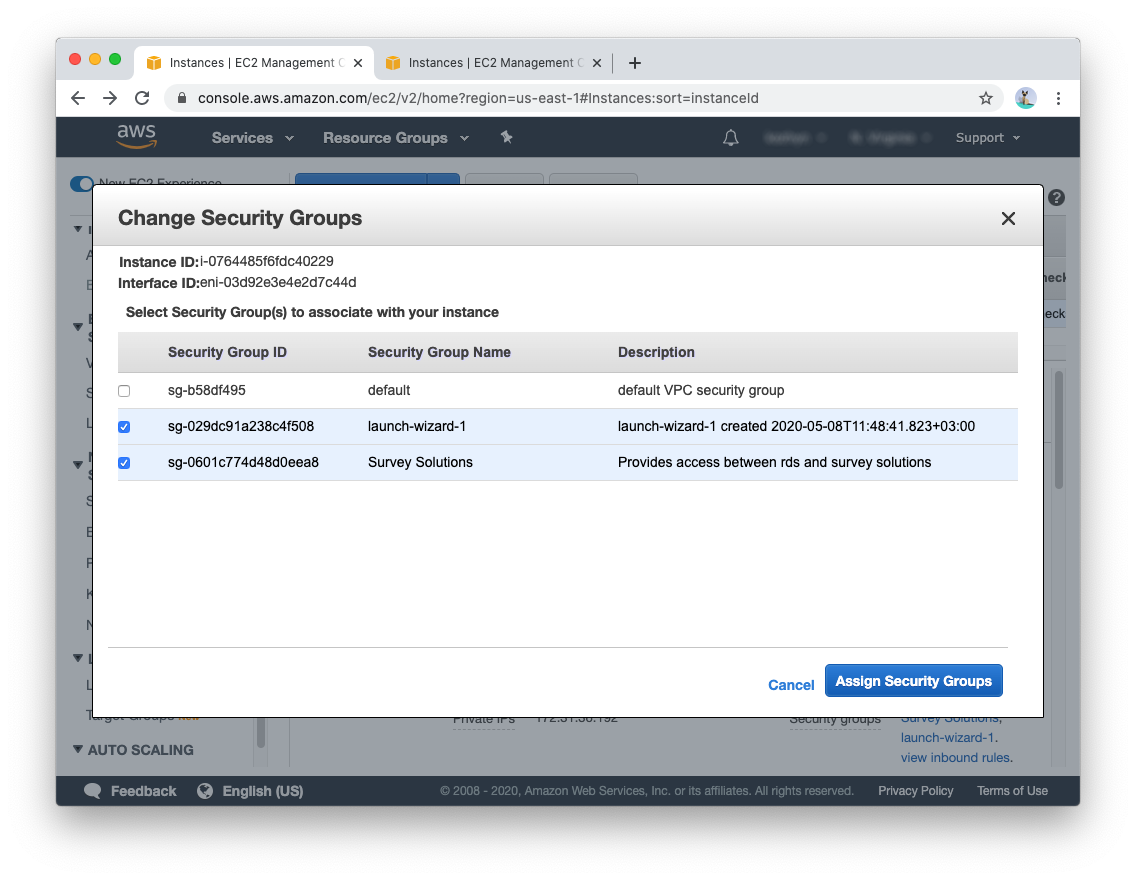
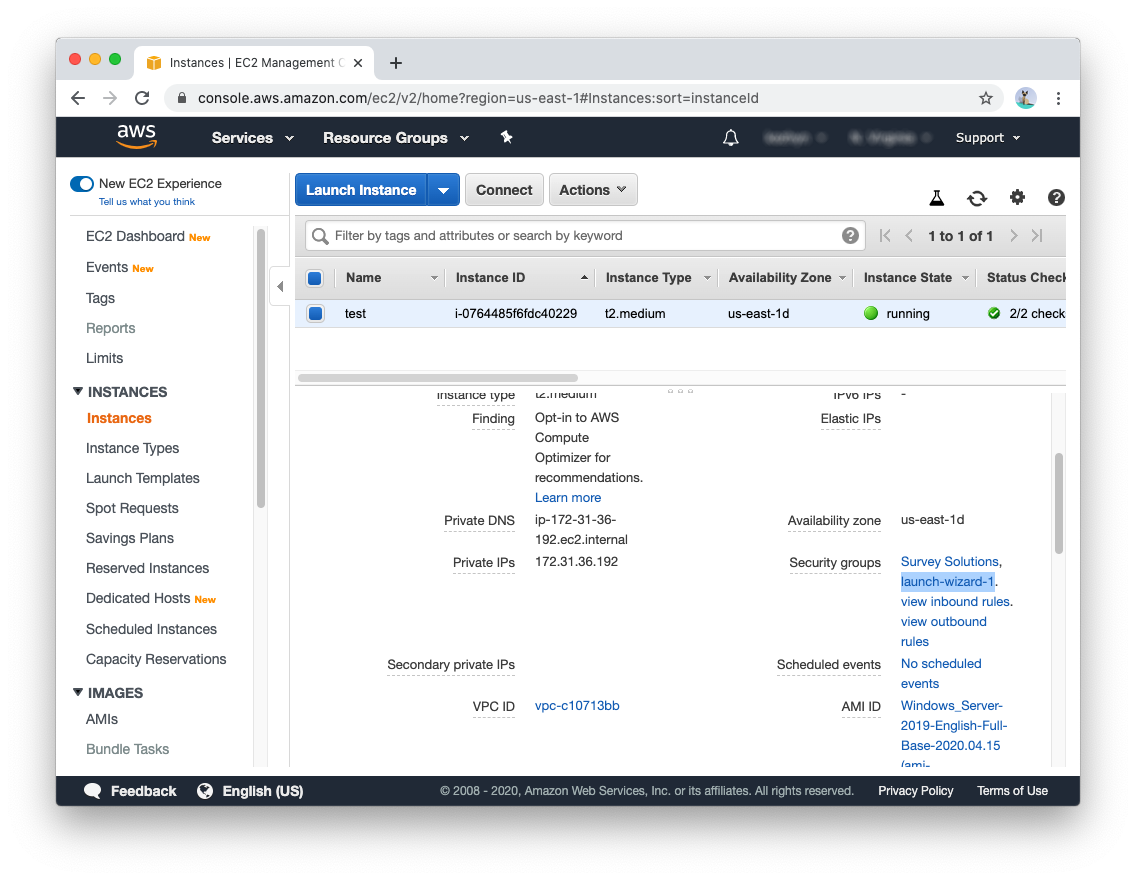
- After instance is created right click on it, select Networking -> Change Security Groups and assign group Survey Solutions
- Launch selected instance
Survey Solutions installation
Connect to the EC2 instance
When your instance is running, connect to it with RDP using instructions.
Download Survey Solutions installer
Once connected, download the Survey Solutions installer. Before doing so, you may need to change the security settings of Internet Explorer (IE) on the EC2 instance to make download possible. To do so:
- Open IE
- Navigate to Settings>Internet>Security>Trusted Sites
- Add
https://mysurvey.solutionsas a trusted site - Reduce the security level for this zone to
Medium-low - Click
ApplyandOK
To download the Survey Solutions installer:
- Navigate to installer download page in a browser outside of the RDP connection
- Right-click the
DOWNLOADbutton - Select
Copy link address - Paste the link into the address bar of IE in the RDP connection in order to download the installation file on the EC2 instance
Install Survey Solutions
Once the installer is downloaded, perform these installation steps (skip PostgreSQL part). When asked for the database connection, enter the endpoint from RDS setup and database credentials.
Change port from 9700 to 80
Delete default web site from IIS web sites list and add :80 port binding to Survey Solutions web site:
- Right-click on
start menu->run - Execute
inetmgrto start IIS manager - Look in the left-hand
Connectionspanel - Expand the entry
- Expand
Sites - Right-click on
Default Web Siteand selectremove - Select Survey Solutions site
- In the right panel under
Edit Site, click onBindings - Select the existing site binding
- Change
Portfrom 9700 to 80 - Leave host name empty for now
Expose 80 port to external users
- In the AWS console EC2 running instances find security group where only web server is included (for me it is “launch-wizard-1”):
- Navigate to Network & Security -> Security Groups in the left panel
- Find group of the web server and click on it
- Click Edit Inbound Rules
- Add Rule
- Type: HTTP
- Select:
0.0.0.0/0as Source
- Save rules
In Survey Solutions installation location Site folder find appsettings.production.ini file, and remove :9700 from BaseUrl.
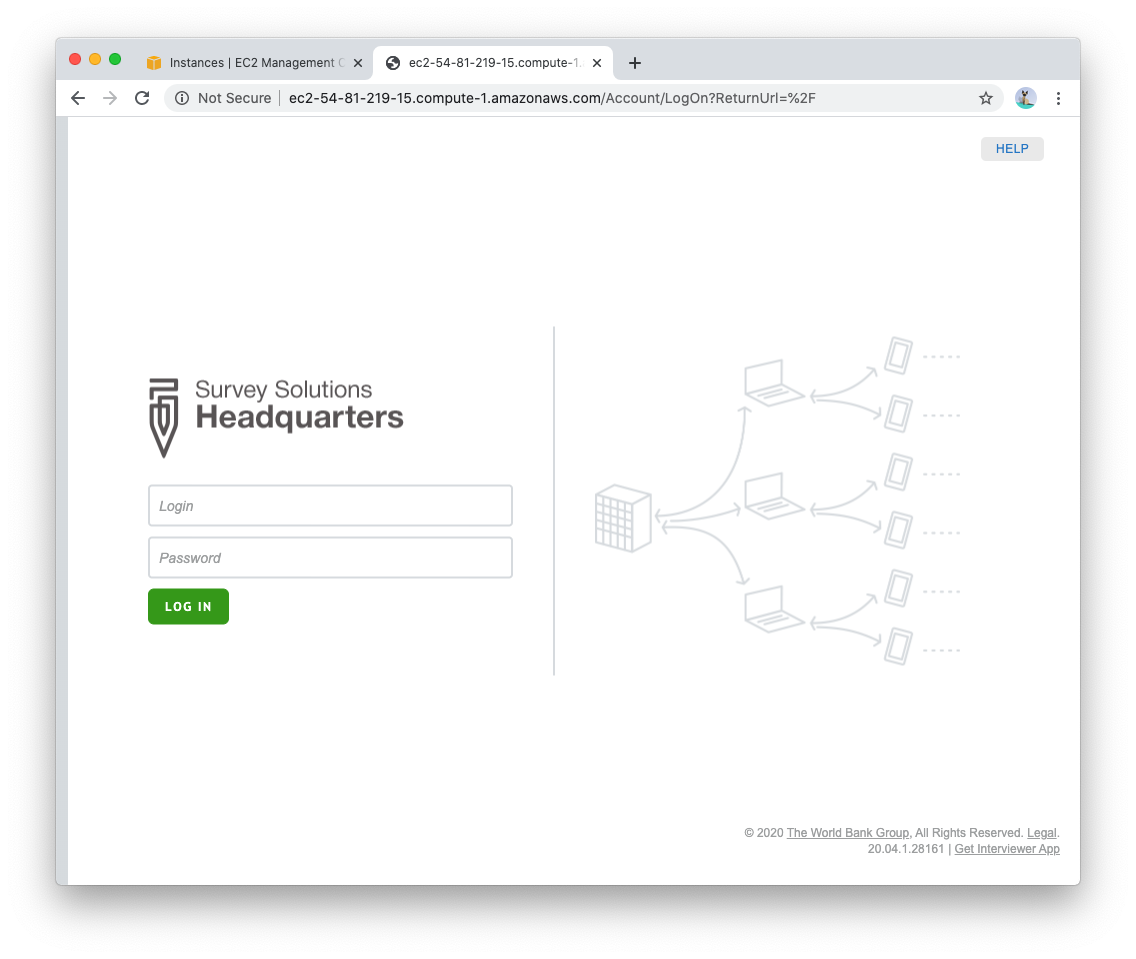
When done correctly you should be able to access Survey Solutions application from your browser by using public DNS:

Copy value from your console to browser address bar:
DNS and SSL
Also we recommend enabling public DNS name for your survey solutions instance. Choose any DNS registrar you like, or maybe you already have domain name. When it is resolved to public IP address of Amazon EC2 instance change BaseURL setting in appsettings.production.ini file. If SSL is used, set BaseUrl to https://%your dns name%.
S3 Configuration
Survey Solutions can store multimedia data (images, audio audit, etc) in Amazon S3 storage to reduce load on database instance.
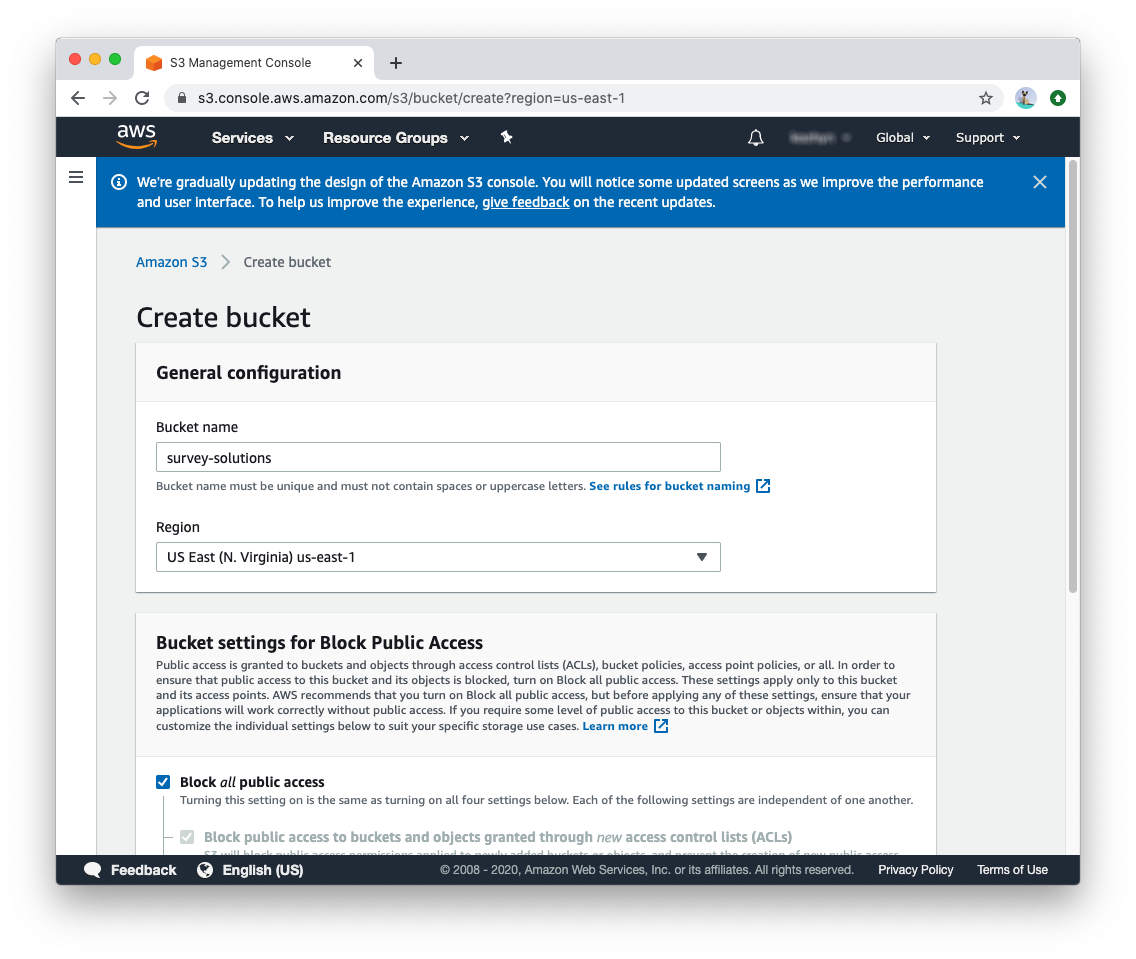
In order to enable S3 storage open S3 service console and create new bucket (you will need to pick name according to naming rules):
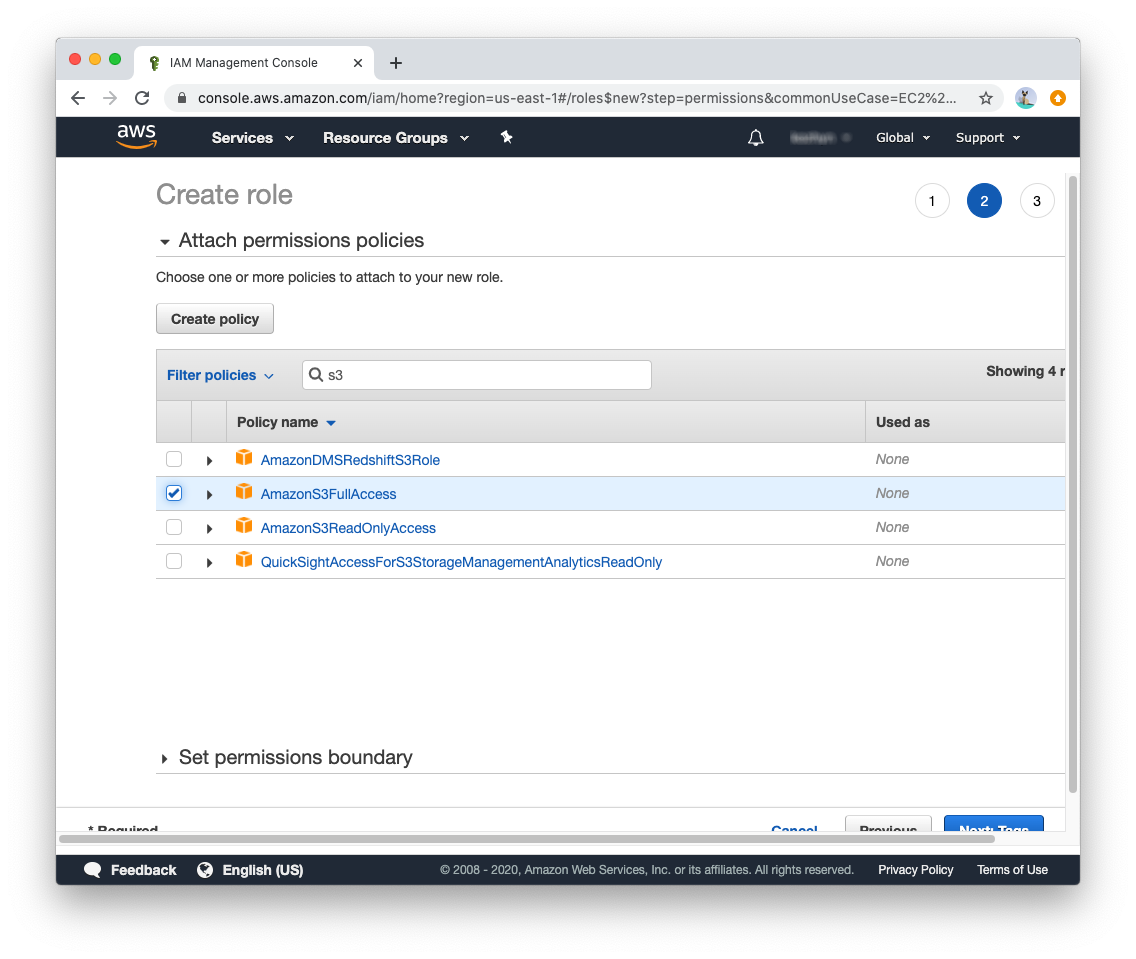
Now to enable Survey Solutions access to that bucket new IAM role will be required. In order to create it in services list find IAM, then go to Roles->Create new role:

Provide name, and attach appropriate S3 full access policy:
 Or create restricted policy via “Create Policy” button and to JSON tab add following content:
- AWS IAM user should have following permissions on bucket:
- s3:GetObject
- s3:ListBucket
- s3:PutObject
- s3:DeleteObject
{
    "Version": "2012-10-17",
    "Statement": [
        {
            "Sid": "VisualEditor0",
            "Effect": "Allow",
            "Action": [
                "s3:PutObject",
                "s3:GetObject",
                "s3:ListBucket",
                "s3:DeleteObject"
            ],
            "Resource": [
                "arn:aws:s3:::%YOUR_BUCKET_NAME%/*",
                "arn:aws:s3:::%YOUR_BUCKET_NAME%"
            ]
        }
    ]
}
Replace %YOUR_BUCKET_NAME% with Your own bucket name
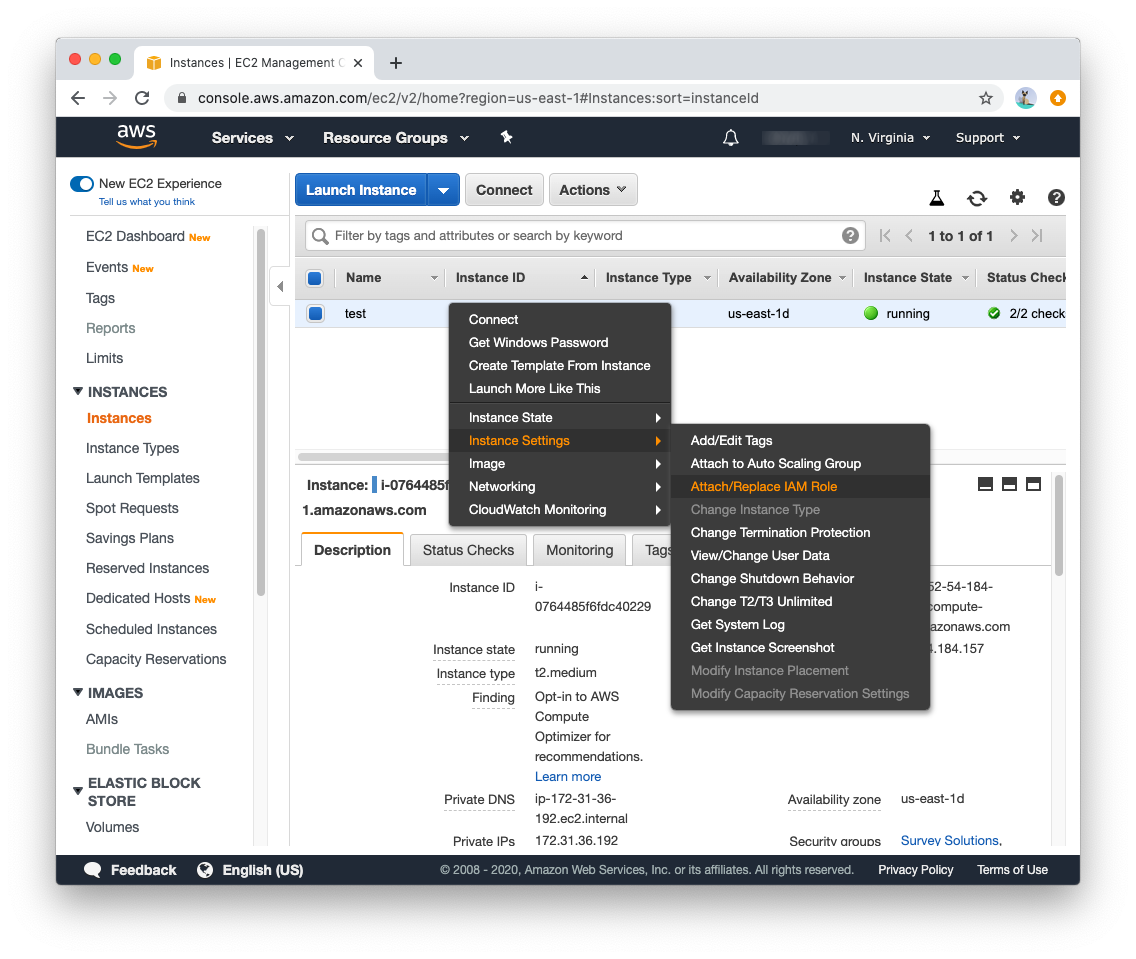
In order to attach this role to EC2 instance open EC2 console, find the appropriate image and select Attach/Replace IAM role:
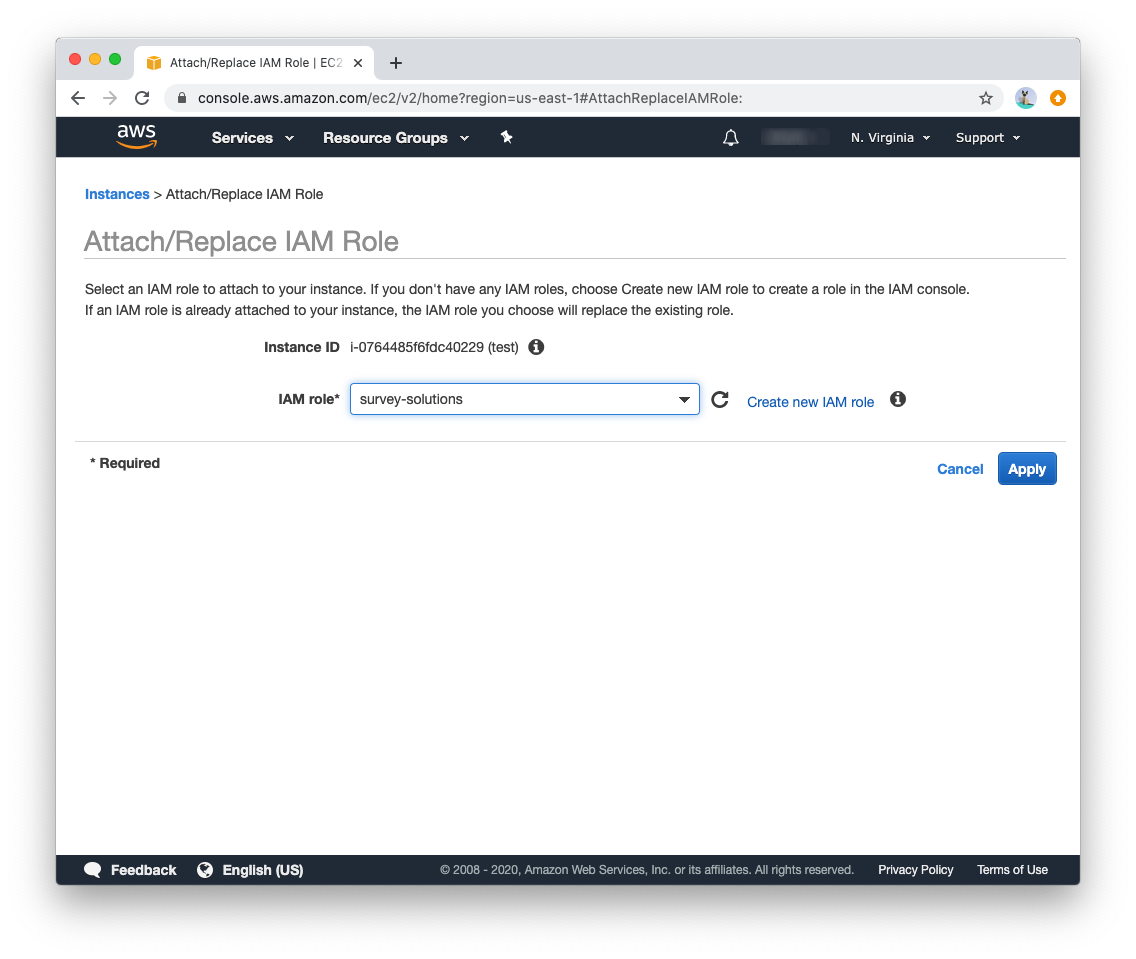
 Then select the created role:
In Survey Solutions installation location Site folder find appsettings.production.ini file.
- Change storage options. In configuration file replace
AppDatakey value toAppData=s3://%Your bucket name%/hqa.hqis the prefix for all data from HQ. Like a folder in file system where HQ will store it’s files - Add section with region configuration (use same region as your S3 bucket)
Your configuration file should contain such configuration:
[FileStorage]
AppData = s3:/%YOUR_BUCKET_NAME%/hq

[AWS]
Region = us-east-1 # replace with your region
Restart Windows image for changes to take effect.
Survey Solutions will create folder with configured tenant name where it will store the binary data for the interviews.
How to configure S3 outside of Amazon EC2 server
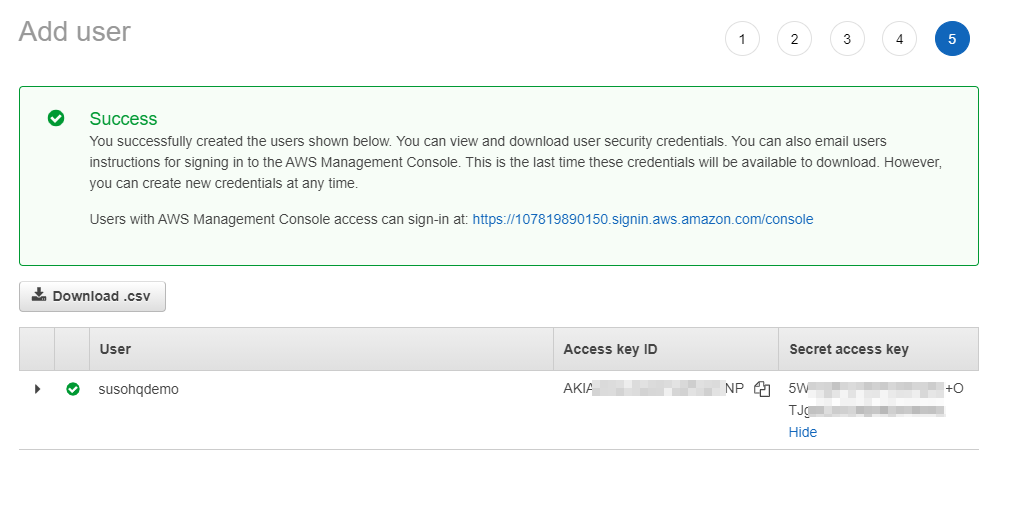
It is also posible to use S3 object storage outside of Amazon Cloud, but be aware that Amazon will apply additional billing on all used traffic between Your server and S3. You will need IAM user credentials (secret key ID and secret key)
On IIS
For deployment on IIS You need to create special credentials file with IAM user credentials, and provide HQ application a location of this file
- Create
credentialfile somewhere on server, for exampleC:\inetpub\credentialsor into Survey Solutions installation folder - Put there IAM user credentials in following form:
[default]
aws_access_key_id = AKxxxxxxxxxxxxx
aws_secret_access_key = HwIgxxxxxxxxxxxxxxxxxxxxxxyU
- Add following lines in AWS section to
appsettings.production.iniof Survey Solutions Headquarters application
[AWS]
Region = us-east-1
Profile = default
ProfilesLocation = C:\inetpub\credentials

[FileStorage]
AppData="s3:/%YOUR_BUCKET_NAME%/hq"
On Docker
For Docker deployment You can specify secret keys in ENV variables:
Docker-compose.yml
version: '3'
services:
  hq:
    image: 'surveysolutions/surveysolutions'
    depends_on:
     - "db"
    environment:
      HQ_ConnectionStrings__DefaultConnection: 'db connection string'
      HQ_Headquarters__BaseUrl: 'http://demo.hq.app'
      AWS_ACCESS_KEY_ID: AKIAxxxxxxxxxxxZL3Q
      AWS_SECRET_ACCESS_KEY: HwIgxxxxxxxxxxxxxxxxxxxxxxxxxJ5yU
      HQ_FileStorage__AppData: s3:/%YOUR_BUCKET_NAME%/hq
    restart: always
Using MiniO new in v21.06 of HQ
It also possible to configure HQ to work with MiniO - self hosted object storage service https://min.io/ There is a few additional settings required to be provided:
ServiceURLpointing to MiniO installationForcePathStyleequaltrueas required by MiniOUseHttpequaltrueif MiniO is hosted without SSL
[AWS]
Profile = default
ServiceURL = https://minio.url
Region = us-east-1
ForcePathStyle = true

[FileStorage]
AppData="s3://hqdemobucket/hq"
In Docker
version: '3'
services:
  hq:
    image: 'surveysolutions/surveysolutions'
    depends_on:
     - "db"
    environment:
      HQ_ConnectionStrings__DefaultConnection: 'Server=db;Port=5432;User Id=postgres;Password=pg_password;Database=SurveySolutions'
      HQ_Headquarters__BaseUrl: https://hqurl
      HQ_AWS__Region: us-east-1
      HQ_AWS__ServiceURL: http://minio
      HQ_AWS__UseHttp: true  # only required if minio has no https support
      HQ_AWS__ForcePathStyle: true
      AWS_ACCESS_KEY_ID: "minio"
      AWS_SECRET_ACCESS_KEY: "minio123"
      HQ_FileStorage__AppData: s3://miniobucket/hq
    restart: always
    ports:
      - 80:80
  minio:
    image: minio/minio
    volumes:
      - storageVolume:/data
    expose:
      - "9000"
    ports:
      - 9000:9000
    command: server /data
    environment:
      MINIO_ROOT_USER: minio
      MINIO_ROOT_PASSWORD: minio123
volumes:
    storageVolume: